
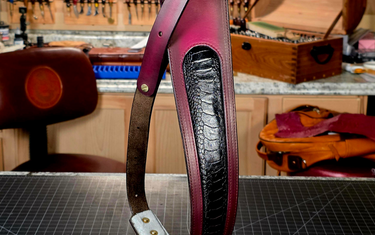
There’s something special about building a leather project that’s not only functional but also completely unique. An exotic inlay rifle sling is one of those projects that lets you combine traditional leathercraft techniques with the natural beauty of exotic leather.
For this build, we used an ostrich leg inlay, but the same process can be used with a variety of exotic leathers. The inlay adds a one-of-a-kind detail while still creating a durable, practical piece that’s meant to be used.
Bonus: Everything needed for this build is included in the August 2026 Maker’s Project Box! From the pre-cut sling pieces and template to the ostrich leg exotic, we put together everything you need to follow along and create your own.
Whether you’re building this exact project or putting your own spin on it, let’s walk through the process.
Supplies Needed
For this project, you’ll need:
- 8–10 oz vegetable-tanned leather for the sling body
- Exotic leather for the inlay (we used ostrich leg)
- Split suede or rough-out leather for the liner
- Contact cement
- Double-sided tape
- Leather dye
- Leather conditioner/finish
- Thread
- Rivets
- Chicago screws
- Basic leatherworking tools
If you grabbed the August 2026 Project Box, you already have the main components needed to get started, and it’s already precut.
Step 1: Prepare Your Sling Pieces
The rifle sling consists of three main pieces:
- The main body piece
- The plug piece that creates the inlay opening
- The bottom strap section
The template is designed so the center section can be removed to create space for your exotic inlay.
If you’re not adding an exotic inlay, simply leave that section intact and you’ll have a solid sling body that can be tooled, stamped, or decorated however you’d like.
When cutting the rounded corners on the inlay opening, a large hole punch makes the process much easier. Punch your corner holes first, then cut toward them instead of trying to cut a perfect curve by hand.
Step 2: Prepare Your Inlay Plug
The plug piece sits underneath the exotic leather and gives the sling more structure and dimension.
Before installing your exotic:
- Trim a small amount from each side of the plug
- Slightly skive the edges
- Round the transition so the exotic leather sits naturally
This step helps prevent the inlay from looking flat and gives the finished sling a more professional appearance.
Remember, this is also a working piece of gear. Adding that extra layer gives the sling more substance and durability.
Step 3: Dye Your Leather
Before assembling everything, finish your leather pieces.
For this build, we used an oxblood base with a darker edge color to create some depth.
A few leather dying tips:
- Build your color in layers rather than trying to achieve the final color in one coat
- Airbrushing gives you more control and helps create smooth transitions
- Always allow your dye to dry completely before moving on
Once the dye has dried, apply a leather conditioner or finish. This helps bring the color together and restores some moisture after dyeing.
Step 4: Finish the Inlay Opening
Before installing your exotic leather, clean up the inside edge of your opening.
A finished edge makes a huge difference.
Take time to:
- Darken the inside edge
- Burnish the opening
- Smooth any rough areas
Even though this area will be partially covered, those small details show through in the finished project.
Step 5: Install Your Exotic Leather
Now it’s time for the fun part.
Lay your exotic leather underneath the opening and decide where you want the pattern to sit.
With ostrich leg, take advantage of the natural scale pattern. Find the section that highlights the character of the leather and center it where it will be most visible.
Once you’re happy with placement:
- Apply contact cement to both surfaces
- Allow the adhesive to become tacky
- Carefully place your exotic leather
- Press and shape the edges into place
Take your time here. Exotic leather is the feature piece of the project, so placement matters.
Step 6: Stitch the Inlay
Once your exotic is secured, stitch around the inside edge of the opening.
This can be done with:
- A sewing machine
- Hand stitching
A sewing machine will speed up the process, but hand stitching works great and gives the project a traditional leathercraft feel.
Step 7: Add the Liner
A rifle sling is meant to be comfortable and stay in place.
Adding a suede or rough-out liner helps prevent the sling from constantly sliding off your shoulder.
When attaching your liner:
- Leave the bottom section open so the strap attachment can slide between the layers
- Glue the liner into place
- Stitch around the outside edge
Once stitched, trim the excess liner flush with the sling body.
Step 8: Finish Your Edges
The final details are what make a project look complete.
Take the time to:
- Edge your leather
- Apply dye to your edges
- Burnish until smooth
A properly finished edge takes a project from homemade to professional.
Step 9: Attach the Strap
The final step is attaching the bottom strap section.
Line up your holes and secure the strap with your hardware.
Chicago screws allow you to adjust the sling to fit your firearm and your preferred length.
Finished!
That’s it! You’ve built your own exotic inlay rifle sling.
The best part about leathercraft is that every piece tells a story. Between the natural markings of the exotic leather and the choices you make throughout the build, no two slings will ever be exactly alike.
We hope you enjoyed building along with us and that this project gives you a chance to learn a few new techniques, experiment with exotic leather, and create something you’ll be proud to use.
Happy crafting!
- Maker’s Leather Supply