
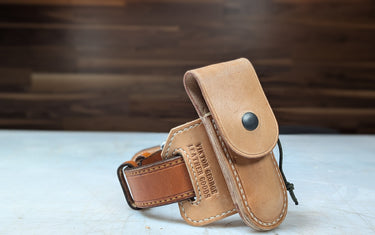
A Buck 110 is a classic knife, and a good leather sheath is a great project for anyone looking to put their leatherworking skills to work.
This style of pancake knife sheath is relatively straightforward to build, but it also offers plenty of opportunities to practice important leatherworking techniques, from patternmaking and clean curves to welt construction, edge finishing, hardware installation, and stitching.
In this guide, we’ll walk through the general process of making a leather Buck 110 sheath, including how to create the pattern, cut and prepare your leather, install the hardware and finish the final piece.
The design featured here was created by leatherworker George Cubic, who built this particular sheath around the Buck 110 and incorporated a versatile T-nut attachment system that allows for multiple carry positions.
Materials and Tools
For a Buck 110 leather sheath, you’ll need:
- 8 oz. vegetable-tanned leather
- Pattern material or cardstock
- Buck 110 knife
- Sharp leather knife
- Ruler
- Wing dividers
- Edge beveler
- Turn-back edger
- Sandpaper or sanding board
- Hole punches
- Stitching irons
- Stitching awl
- Leather adhesive
- Snap hardware
- T-nuts and appropriate hardware
- Thread
- Burnishing supplies
- Leather finish or wax
The exact tools and hardware can vary depending on how you choose to construct your sheath. One of the advantages of this project is that there are several ways to accomplish many of the steps.
1. Create the Pattern
A good leather sheath starts with a good pattern.
For a Buck 110, begin by establishing a centerline on your pattern material. From there, build the basic dimensions around the knife.
The rounded bottom of the sheath can be established using a 2.25-inch measurement, with the body of the sheath extending upward from that point. The design also incorporates a welt around the knife to provide clearance and protect the stitching.
Before cutting leather, place the actual knife on your pattern whenever possible. This allows you to check the fit before committing to your leather.

2. Plan the Belt Attachment
One of the features that makes this style of sheath different from a simple fixed belt loop is the pancake-style attachment system.
The design uses T-nuts on the back of the sheath, allowing the sheath to be attached in different orientations.
This gives you the option of carrying the knife vertically, horizontally, or in a cross-draw configuration depending on how the hardware is installed.
When laying out the T-nut locations, take the size and weight of the knife into consideration. The hardware should be positioned so the finished sheath sits comfortably when worn.

3. Cut the Leather
For this style of sheath, 8 oz. vegetable-tanned leather provides a good combination of structure and durability.
Transfer your pattern to the leather and carefully cut out the main pieces.
When making long cuts, don’t try to force your knife through the leather in a single pass. Several controlled passes will generally give you a cleaner and more accurate cut.
For tight curves, a hole punch can be your best friend.
Instead of trying to cut a perfect radius with a knife, punch the ends or corners of the area first and then cut into those openings. This creates a much cleaner transition and reduces the chance of cutting past your intended line.
Maker’s Tip: Cut slightly outside your pattern line. You can always remove leather during cleanup, but you can’t put it back.

4. Clean Up the Edges
Once the pieces are cut, take some time to refine them.
Sand away rough areas and make sure your curves are smooth and consistent.
An edge beveler can be used on the exterior edges, while a turn-back edger is especially helpful for tight interior curves.
These small areas can be difficult to reach with a standard edger, but cleaning them up now will make the finished sheath look much more professional.

5. Burnish the Edges
After beveling, burnish the edges to compress the leather fibers and create a smooth finish.
You can use your preferred burnishing method, whether that’s a hand burnisher, canvas, wood slicker or another finishing system.
For tight curves, a smaller burnishing tool or felt wheel can make the process considerably easier.
Don’t rush this part.
A clean edge is one of those details that can make an otherwise simple sheath look finished and intentional.
6. Cut the Belt Slots
If you’re using the pancake-style belt attachment, you’ll need to cut the slots in the back panel.
An oblong punch, like a bag punch, makes this step quick and clean.
If you don’t have an oblong punch, you can also punch a hole at each end of the slot and carefully cut between the two holes.
Once the slot is cut, clean and smooth the edges before moving on.

7. Customize the Front Panel
This is where you can make the sheath your own. The front panel can be left clean and simple, or you can add:
- A decorative crease
- Tooling
- Stamping
- Carving
- An exotic leather inlay
- Your maker’s mark
The construction remains essentially the same regardless of how you decorate the front.
That’s one of the reasons this makes such a good leatherworking project, the basic design gives you a foundation that you can customize to your own style.
8. Build the Welt
The welt is an important part of a knife sheath. It creates space between the front and back pieces so the knife isn’t sitting directly against the stitching.
For this design, the welt is built around the knife opening and follows the shape of the sheath. Use your wing dividers to establish the welt line, then cut out the center section.
Maker’s Tip: Don’t automatically throw your welt cutout in the scrap bin. Smaller leather pieces can make excellent belt loops, keepers and other small components.
9. Install the Hardware
Before permanently assembling the sheath, install or prepare the hardware locations. This includes your snap and T-nut hardware. Pay close attention to how the hardware sits against the knife. Any exposed metal on the inside of the sheath can potentially scratch the knife, so hardware placement matters.
This is one of those steps where it’s worth dry-fitting everything before committing to adhesive or permanent hardware installation.
10. Assemble the Sheath
Once your pieces are prepared, it’s time to bring everything together.
Apply your leather adhesive to the appropriate surfaces and carefully position the welt between the front and back panels.
A smooth-faced cobbler’s hammer can be useful for setting the glued leather together without leaving unwanted marks.
Make sure the edges line up and the welt is positioned correctly before the adhesive fully sets.
11. Mark and Punch Your Stitching Holes
Establish your stitch line using wing dividers.
For a clean, consistent appearance, use your stitching iron to establish evenly spaced holes around the perimeter. A 5 mm stitching iron works well for this style of sheath, although your preferred spacing may vary depending on the look you’re after. For tighter areas, a smaller prong iron can help you maintain a consistent stitch pattern around curves.
12. Stitch the Sheath
Once your holes are prepared, stitch the perimeter of the sheath. This can be done by hand or with a leather sewing machine.
If you’re hand stitching, maintain consistent tension throughout the seam and make sure your stitches remain seated evenly in the leather.
If you’re using a machine, take your time around the curves. Slowing down and making your turns deliberately will help maintain an even stitch line.

13. Finish the Leather
With the construction complete, it’s time for the final finishing work.
Depending on the look you’re after, you can use a leather conditioner, oil, wax or another finish appropriate for vegetable-tanned leather.
For a working knife sheath, a wax-based finish is a good option for adding some protection while still allowing the leather to develop character through use.
Apply your finish evenly, allow it to set, and buff the sheath once you’re finished.
14. Install the Knife and Check the Fit
Before putting the sheath into regular use, check the fit carefully. The knife should sit securely without being excessively difficult to remove. Check the snap, stitching, welt, and belt attachment points to make sure everything is secure.
Then wear it.
A good sheath isn’t just supposed to look good sitting on your workbench. It’s supposed to work.

Make It Your Own
The basic Buck 110 pancake sheath is a great starting point, but there’s no reason your finished project has to look exactly like anyone else’s. You can:
- Change the leather.
- Tool the front.
- Add an exotic inlay.
- Change the stitching.
- Experiment with the finish.
- Try a different carry configuration.
The construction techniques stay largely the same, which means once you’ve built one, you can start experimenting with your own versions.

Want to Watch the Full Build?
If you’d rather watch the entire process from start to finish, George Cubic walks through this build step-by-step in his leatherworking course on Illume Connect.
The full course goes deeper into the construction techniques, tools, and decisions that go into building this Buck 110 sheath.
If you received access through the September Project Box, your course access is available through Illume Connect for as long as you have access to your account.
Watch George’s full Buck 110 sheath course on Illume Connect →
And if you’re looking for the materials used in this exact build, the September Project Box was built around this project and included the pattern and materials needed to get started.