
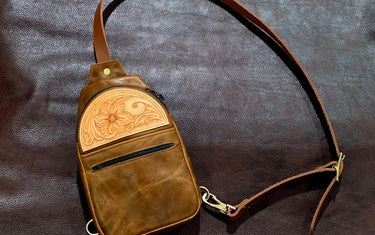
If you’ve been thinking about building a leather bag but aren’t ready to dive into a full-sized duffel or backpack, a sling bag is a great place to start. It’s a manageable project that still gives you experience with many of the skills that show up in larger bag builds, including tooling, stitching, zipper installation, hardware placement, and final assembly.
For this project, we’re using bison leather paired with a Hermann Oak tooling patch. The combination gives you a durable everyday bag with plenty of room to add your own style through carving, stamping, dye, or finish work.
What Is a Leather Sling Bag?
A sling bag is basically the smaller, more streamlined cousin of a traditional crossbody bag.
Instead of carrying it with two straps, a sling bag typically uses a single strap that runs across your body. That makes it handy for carrying the things you actually need without hauling around a bulky bag.
They’re great for everyday carry, travel, shows, outdoor activities, or just when you don’t want to stuff your pockets full of everything you need.
And from a leatherworker’s perspective? They’re a pretty fun project.
You get enough surface area to show off some nice leather and custom tooling, but you’re not spending weeks building a large bag from start to finish.
What You’ll Need
If you’re following along with the October Project Box, we’ve already taken care of the main materials for you.
The October Project Box includes:
- Bison leather for the sling bag
- Hermann Oak vegetable-tanned leather tooling patch
- Sling bag pattern
- Zipper
- All required hardware
You’ll still need your basic leatherworking tools, along with whatever tooling stamps, dyes, antiques, and finishes you want to use on your patch.
Some helpful tools to have nearby:
- Sharp knife or leather scissors
- Cutting mat
- Scratch awl
- Hole punches
- Edge beveler
- Sandpaper
- Leather adhesive
- Stitching chisels and needles
- Leatherworking mallet
- Swivel knife
- Tooling stamps
- Dye, antique, or finish for your patch
- Edge finishing supplies
Maker’s Tip: Before you start, lay everything out on your bench. Having your materials, hardware, tools, and pattern organized before you begin makes the entire build go a lot smoother.
1. Review the Pattern and Plan the Build
Before you start cutting leather, take a few minutes to study the pattern. Identify the body panels, strap components, zipper locations, hardware placement, and where the tooling patch will sit. This is one of the easiest ways to avoid mistakes later.
Our favorite rule:
Read the pattern before cutting the leather.
A few minutes spent planning can save a lot of frustration later on.
2. Plan Your Tooled Leather Patch
Before you cut or assemble anything, decide what you want to do with the Hermann Oak tooling patch. This is your chance to make the bag your own.
You could keep things simple with a decorative border and a few stamps, or go all out with floral carving, geometric tooling, a basketweave pattern, or your maker’s mark.
If you’re newer to tooling, don’t feel like you need to create a masterpiece. A simple design that’s executed well often looks better than trying to fit every stamp you own onto one small piece of leather.
Maker’s Tip:
- Plan your design before you start tooling.
- Lay out your stamps.
- Think about your borders.
- Make sure your design actually fits the patch.
- You don’t want to get halfway through tooling and realize you’ve run out of room.
3. Case the Hermann Oak Leather
Hermann Oak vegetable-tanned leather is a great choice for tooling because it takes impressions beautifully. Before you start stamping, you’ll want to properly case the leather. You want the leather damp enough to take crisp impressions but not soaking wet.
If you’re unsure whether the leather is ready, test a stamp on a scrap piece first.
Maker’s Tip:
Don’t rush this part.
Good casing makes a noticeable difference in how your tooling looks.
Too wet and your impressions can become soft and muddy.
Too dry and you won’t get the depth and detail you’re after.
4. Tool and Finish the Patch
Once the leather is properly cased, transfer your design and start tooling. Take your time. Start with your swivel knife cuts and then work through your tooling in a logical order. If you’re newer to tooling, focus on consistency. You’re not racing anyone.
One of the biggest things we tell new makers:
Let the tool do the work.
A controlled strike with properly prepared leather usually creates a better impression than swinging your mallet like you’re driving fence posts.
Once your tooling is complete, decide how you’d like to finish the patch.
You could:
- Leave it natural
- Dye the leather
- Apply antique paste
- Add a resist
- Create a contrasting background color
- Apply a protective top finish
Always test finishes on scrap leather first. Leather has a way of surprising you.
5. Cut the Leather Components
Now we’re ready to start building the actual sling bag. Lay the pattern pieces onto the bison leather and carefully mark your cuts. Then cut out all of the required components. This is where a sharp blade matters. Bison leather has a beautiful natural texture, and clean cuts will make the assembly process much easier. Keep your blade sharp and use controlled cuts.
If you find yourself forcing the knife through the leather, stop and sharpen it. A sharp blade is safer and produces better results.
6. Dry Fit the Pieces
Before you glue, stitch, or set hardware, lay everything out the way it will be assembled. It’s amazing how many little issues show up during a dry fit. A misplaced piece of hardware, a backwards zipper, or an upside-down panel is much easier to fix now than after everything is stitched together.
Check:
- Patch placement
- Zipper orientation
- Hardware locations
- Stitching lines
- Panel alignment
7. Attach the Tooled Leather Patch
Once you’re happy with the placement, attach the tooled Hermann Oak patch to the designated panel. Apply your adhesive according to the manufacturer’s instructions and carefully place the patch. Many makers choose to stitch around the patch after gluing for added durability and a clean finished look.
If you’re planning to stitch around the patch, now is the time to mark your stitch line and get everything aligned.
8. Install the Zipper
If there’s one part of a bag build worth double-checking, it’s probably the zipper. Most of us have sewn one in backwards at least once, and it’s a frustrating thing to discover after the bag is fully assembled. Before you start stitching, cycle the zipper a few times, confirm the pull is where you want it, and make sure everything lines up the way the pattern intended.
A few things to check:
- Does it zip smoothly?
- Is the pull on the correct side?
- Are the panels aligned?
- Does the zipper sit where the pattern intends?
It’s a lot easier to fix a zipper before stitching than after the bag is assembled.
9. Assemble the Main Bag Body
With the patch and zipper installed, you can begin assembling the main body of the sling bag. Follow the pattern one step at a time. Don’t try to jump ahead.
Leather bags involve several components that eventually come together, and taking your time during assembly usually produces cleaner results. If you’re hand stitching, pay attention to your stitch tension. You want your stitches snug without pulling them so tight that they distort the leather.
If you’re machine sewing, test your settings on scraps before sewing your finished pieces.
10. Install the Hardware
Now it’s time to install the hardware.
Depending on the design, this may include strap attachments, D-rings, buckles, Chicago screws, rivets, or adjustment hardware. Before setting anything permanently, double-check orientation. It sounds obvious, but most leatherworkers have installed a buckle, D-ring, or strap attachment backwards at least once. Usually only once, because it’s a mistake you remember pretty quickly.
Hardware experiences a lot of stress during everyday use, so make sure everything is seated properly and securely installed.
Maker’s Tip: Lay your hardware out in the order you’ll use it. It makes assembly much easier and helps prevent mistakes.
11. Finish the Edges
Edge work doesn’t get nearly as much attention as tooling or stitching, but it can completely change how polished a finished bag feels. Start by making sure your cuts are clean.
Then:
- Sand where needed
- Bevel the edges
- Burnish or finish the edges
- Apply edge paint if desired
You don’t necessarily need every edge to look like glass. You just want them to look clean, consistent, and intentional. If your edges aren’t looking right, don’t immediately reach for more edge finish. Go back a step. Is the edge smooth? Is it even? Did you bevel consistently?
Good edge work starts with good preparation.
12. Final Assembly and Inspection
Once the body, patch, zipper, hardware, and strap are complete, it’s time for a final inspection.
Check:
- Stitching
- Edges
- Hardware
- Patch attachment
- Zipper operation
- Strap attachment
- Excess adhesive
- Overall shape
Then actually use the bag. Open and close the zipper. Adjust the strap. Put a few items inside. Wear it around for a minute. You may notice a small adjustment you’d like to make before calling it finished.
Common Leather Sling Bag Mistakes to Avoid
If this is one of your first leather bag projects, here are a few things we’d keep in mind.
1. Rushing the Cutting
Clean cuts make every step afterward easier.
2. Tooling Leather That’s Too Wet or Too Dry
Properly cased leather tools better and produces cleaner impressions.
3. Skipping the Dry Fit
Especially with zippers and hardware. Don’t skip it.
4. Overcomplicating Your Tooling
One of the easiest mistakes to make when you’re learning tooling is trying to use every stamp in the drawer. Simple designs almost always age better. A clean border, good spacing, and consistent impressions often have more impact than a patch packed with decoration.
5. Forgetting to Test Functionality
Before calling the project complete, test the zipper, hardware, and strap. You’ll be glad you did.
Make It Your Own
This is probably our favorite part of making leather goods. The pattern gives you the foundation. You decide what the finished piece looks like. Maybe that means trying a different thread color, adding a custom carving, experimenting with antique finishes, or changing how you finish the edges. Small changes can completely alter the look of the finished bag.
Once you understand the basic construction, you can start making changes and eventually use those same skills to create your own designs.
That’s how you go from following patterns to designing your own leather goods.
And that’s what we’re always hoping to help makers do.
Final Thoughts
One of the things we like most about projects like this is that you learn something every time you build one. Maybe it’s a cleaner way to install a zipper, a better edge-finishing technique, or a tooling pattern you’d approach differently next time.
By the time the bag is finished, you’ll have a useful piece of gear and a better understanding of leather bag construction. And if you’re anything like the rest of us, you’ll already be thinking about what you’d change on the next one before this one even leaves the bench.
Build This One Yourself
The October Project Box was built around this project. It includes the bison leather, the Hermann Oak tooling patch, the pattern, the zipper, and all of the hardware you need to get started.
If you’d rather source your own materials, the Maker’s 75% Sling Bag Flexible Template is available on its own, and you can pair it with Hermann Oak tooling leather and your choice of bag leather.