
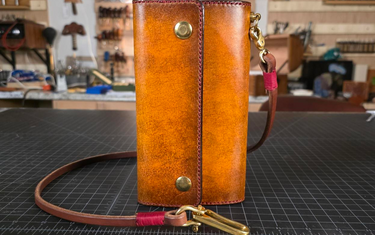
The nice part is that it does not take much. A base coat, a couple of browns, a sponge, and some patience will get you there.
Supplies Needed
- Vegetable-tanned leather
- Pro Dye Saddle Tan for the base coat (Pro Dye Light Brown gives a similar warm tone)
- Pro Dye Golden Brown for the texture layers
- Pro Dye Walnut, or another dark brown, for the accent color
- A natural sponge or wool pad applicators
- Maker's Cordless Airbrush (recommended for the base coat)
- Scrap leather for testing
- Paper or a protective work surface
- Duff's Leather Dressing or another leather conditioner
- A piece of shearling or a clean soft cloth for buffing
- Gloves, and a respirator if you are spraying
- Basic leatherworking tools
Step 1: Apply a Base Coat
Every good antique finish starts on a solid foundation. For this project we used Saddle Tan as the base color. An airbrush is the easiest way to get smooth, even coverage while using very little dye.
Airbrush Tips
- Start your spray off the edge of the project
- Move across the leather in one smooth motion
- Keep spraying past the opposite edge before you stop
Starting or stopping directly on the leather leaves darker spots where the airbrush changes direction. Once you finish a pass, rotate the piece and spray from the opposite direction for even coverage.
Do not worry if you see slight streaking right after spraying. Most of it softens as the dye dries, and small inconsistencies actually help the finish look natural. Let the leather dry before moving on.
Step 2: Prepare Your Sponge
The sponge is what creates the texture in this finish, and the kind you use matters.
A natural sponge works best. The irregular pores leave random, organic patterns, so the leather reads as naturally aged instead of artificially textured.
That said, you can get great results with what is already on your bench. Our High Density Sponges are hand cut thick enough to hold plenty of dye without dripping, and tearing off a small piece gives you a more broken up edge to dab with. Our Wool Pad Applicators are another good option, and the sheep wool lays color down soft and blotchy in a way that suits this technique well. Whatever you reach for, the trick is the same: keep the pressure light and keep changing the angle.
Before You Apply Any Dye
- Soak the sponge completely in water
- Squeeze out as much water as you can
- The sponge should feel damp and flexible, not wet
Prepping it this way keeps the sponge from drinking up too much dye, which gives you a lot more control over the application.
Step 3: Build the First Layer of Texture
Put a small amount of Golden Brown on the sponge. Before you touch your project, dab it onto a piece of scrap leather to pull off the excess. Testing first prevents dark blotches and shows you exactly how much color you are laying down.
Once you are happy with the amount on the sponge, start lightly dabbing across the whole surface of your project. You are not going for full coverage here. You are building subtle layers of texture that still let the lighter base coat show through.
As you work:
- Rotate the sponge often
- Change the angle as you dab
- Avoid repeating the same pattern
Randomness is what gives this finish its character.
Step 4: Darken the Edges
This is where the antique look starts to come together. Leather darkens around the edges over years of handling, so recreating that is what makes a project feel aged.
Using the same Golden Brown:
- Add texture around the perimeter
- Keep the outer edges the darkest
- Fade the color gradually toward the center
Take your time. Rather than laying down heavy coats, build the color slowly with several light applications. Those gradual transitions are what sell the finish.
Step 5: Give Extra Attention to the Corners
Corners take the most wear over time, so spend a little extra time adding color to:
- Corners
- Rounded edges
- High-contact areas
If your project has rounded corners after assembly, darken those areas before you cut or shape them. Small details like this make a big difference in the finished piece.
Step 6: Darken the Fold Lines
One of the easiest ways to add realism is darkening the areas that will eventually fold. Use your template or pattern to find those fold lines before assembly.
Lightly sponge Golden Brown across each fold location, then blend the color outward so it fades into the surrounding leather. Avoid hard, straight stripes. The transition should be soft enough that it looks like natural wear instead of a painted line.
Step 7: Add a Dark Accent Color
Once the Golden Brown layer has dried, bring in a darker color. We used Walnut, though any dark brown will work.
Using the same sponge:
- Focus on the extreme edges
- Add a little depth to the corners
- Lightly darken the center of each fold line
Use this color sparingly. The dark dye should enhance the layers underneath, not cover them up. Less is more here.
Step 8: Let the Leather Dry
Let everything dry completely before you decide whether it needs more color. As the leather dries you will notice softer transitions, more natural blending, and more depth.
If you want more contrast at that point, add another light layer. It is much easier to add color than to take it away, so work gradually.
Step 9: Condition the Leather
Dye pulls some of the natural oils out of leather, so conditioning is an important final step. Apply a light coat of Duff's Leather Dressing across the whole surface.
Conditioning restores moisture, deepens the color, enhances the patina, and adds richness to the finish. If the leather looks darker right after you apply it, that is normal.
Step 10: Buff to a Soft Sheen
Let the conditioner haze slightly, then buff the surface with clean shearling or a soft cloth. Buffing removes the excess and brings out a smooth, natural sheen that finishes off the antique look.
Maker's Tips for Success
- Always test your dye on scrap leather before it touches your project
- A natural sponge gives the most realistic texture, but a high density sponge or wool pad works great too
- Rotate the sponge often so you do not repeat patterns
- Build color gradually instead of applying heavy coats
- Keep the edges darker than the center for an authentic antique effect
- Do not skip the fold lines. They are one of the biggest details that make the finish look natural
- Finish every dyed project with a quality conditioner to restore moisture and bring out the color
- No two pieces of leather are exactly alike, and small variations are part of what makes hand-dyed leather beautiful
Finished!
One of the best things about this technique is that there is no single correct way to do it. Every sponge, every hide, and every maker will end up with slightly different results, and that is exactly what makes hand-dyed leather worth doing.
Take your time, build the color in layers, and do not be afraid to experiment. Before long you will have your own style and projects with the kind of rich, aged character that only comes from a handmade finish.
Happy crafting!
- Maker's Leather Supply